In a comment on the last post, Dianne asked what type of alcohol is used to extract color from wood.
It doesn't really matter what kind of alcohol you use; any will do. It just depends what's available for the least money. I use the type of alcohol that is sold by the big-box DIY store in 1- or 2-gallon jerrycans for use as a cleaner, lacquer thinner, or stove fuel. This "denatured alcohol" is ethyl alcohol with some methyl alcohol mixed in to make it non-consumable (causes blindness or even death if ingested). Some folks swear by moonshine (illegally distilled corn liquor), others use cheap vodka or Everclear (a high-alcohol-content beverage similar to moonshine - it's legal in some US states, not in others). Rubbing alcohol from the pharmacy is usually too expensive, because it's sold in small containers, but it works too.
The alcohol draws out more colorant from the wood chips than plain water, but it takes time. I've got jars of various woods that have been sitting in my studio since March. The liquid in the jar keeps getting darker as the process continues. They'll get used whenever I get around to another wood dye splurge - one of which is gonna be soon, because I need to dye some weft yarns for the upcoming wood series scarves. There is no spoilage problem, because the alcohol inhibits anything that would cause mold to grow, so the jars can sit indefinitely.
It's possible to reuse the wood chips. I did some dyeing with walnut chips extracted in alcohol. Instead of discarding the chips, I strained them out and put them back in the jar with fresh alcohol, which is now as dark a brown as the first extraction. I'll keep reusing them until there's no more color in there. With some woods, the second and subsequent extractions will be not only paler but also a different hue, because the alcohol pulls out different colorants at different rates.
I've used alcohol extraction on materials other than wood. There's a jar of finely ground madder root in a jar in the studio. The first extraction was the classic rusty madder orange. On the second extraction from the same material, the liquid is more red. Eventually, I'll do a third extraction, and hope that it draws out a true red.
Okay, madder root is pretty close to wood in structure, so it's not too much of a stretch to see that the alcohol extraction will work. The jar of lichen is more of a stretch - because lichen is a symbiotic construct of fungus and algae, it's really unlike wood in structure. The true test will be the dyebath, and subsequent light exposure and washing, to see if the chartreuse of the liquid bonds with the fiber/mordant and if it really is light- and wash-fast. Stay tuned!
P.S. I've also got some jars of the type of lichen (various umbilicates) that are extracted with a solution of equal parts of ammonia and water. Unbelievable purple color in those jars! That'll be another exciting dyebath. Smelly, but exciting...
P.P.S. I've written up instructions on using the alcohol extraction method, and plan to put 'em in a PDF on my website. I'll post when that's available.
Showing posts sorted by relevance for query alcohol. Sort by date Show all posts
Showing posts sorted by relevance for query alcohol. Sort by date Show all posts
Monday, August 11, 2008

Saturday, August 09, 2008
Waiting for the Dyepots
The last of the Feather Series scarves is woven, and waiting to have its fringes plied and be wet finished. So, for a day or so, the loom is bare.
I'm working on another Wood Series set of scarves, but these will be quite different from the complex twills I've used for the Wood Series in the past. I'm aiming for something suggestive of rough bark, and am planning plain-weave stripes of shrinkable brown wool alternating with plain-weave stripes of wood-dyed tencel and silk. The latter stripes will be random combinations of left-overs, all the dribs and drabs of various wood-dyed thread from previous Wood Series projects. The cloth will be finished so that the wool shrinks, leaving a faux-seersucker texture.
I know, I know. You probably think it's overkill to use 24 shafts to make plain weave. Tough. The weaving goes much faster with a fly-shuttle and auto-advance...
In the meantime, I've been putting various dye materials to soak in alcohol for future projects. There are rows of jars of wood chips in the studio bathroom, many of which show great promise of wonderful color. To wit:

This jar is full of black acacia chips, and the liquid is a deep red-brown after only a few days. I'll leave it a few weeks to soak so I get as much color as possible on the yarn.

This one is madrone chips. In the past, I've used madrone bark extracted in water, which gives me a neutral tan. I'm looking forward to seeing how different the chips are in the dyepot. If you look at the liquid right next to the lid, you can see the reddish tinge it has acquired. Hopefully, some of that reddish tinge will take on the yarn!

This is black locust, which on the first extraction gave me a screaming gold. I strained out the solids, and poured fresh alcohol over 'em. It'll be fun to find out if the second extraction is different in hue from the first.

And this last one is an experiment. The dye material is mostly usnea lichen (sometimes called Old Man's Beard) with a little evernia lichen mixed in. Normally, these lichens are processed in a boiling water bath. However, since I'm getting interesting results extracting color with alcohol, I decided to give the lichens a try with an alcohol soak. The liquid is chartreuse green, in contrast to the dye material, which is pale grey-green - and getting paler by the day as the alcohol pulls color out of the lichens. I can't wait to see what hits the fiber!
The oak trees on the property are liberally covered with lichens, especially on the dead or dying branches - the lichen doesn't seem to like healthy wood. After I see what happens with the alcohol extraction, I'll try a traditional Boiling Water Method dyebath and compare the results.
Monday, April 02, 2007
Playing with Sawdust
I spent a few days recently playing with sawdust and wood chips gleaned from my husband's woodworking shop. Every time he works with a wood that has an interesting deep color, I scoop up as much as I can and squirrel it away in a bag labeled with the name of the wood. Wood makes great dye! To see if a particular variety has dye potential, just put some sawdust or chips into a canning jar, add water to cover (or even better, denatured alcohol - the cheap stuff found at Home Depot in 2-gallon jerrycans). Wait a while - minutes to weeks - and see what color the liquid turns.
I have in mind a run of scarves made mostly of wood-based yarn (tencel) dyed entirely with wood-based dye, and woven in a design that evokes wood grain. I've got one threading that gives the effect of rough-sawn timber, and am working on another that'll be more like the oak face of the built-in cupboards in the house. These will be interleaved threadings, with a dark color and a light color alternating thread by thread.
First, I mordanted the warp yarns using Michele Wipplinger's method for cellulose, which consists of a scour bath, a mordant bath (aluminum acetate), and a tannin bath (I used myrobalan, a wood-derived tannin). For the skeins that I wanted dark colors on, I also put them through an iron bath at 1% WOF.
Because I planned to dye with wood, which presumably all has some tannin in it, I wasn't sure if the tannin bath was really necessary. However, because I don't know how much tannin a given wood has, it seemed as if it would be best to ensure that there was at least a known amount in there.
Here are the warp yarns. The darker skein is 100% tencel in 30/2 weight, dyed with walnut hulls harvested last fall and fermented in a bucket of water since then. The lighter skein is a 70%/30% tencel/silk blend, also 30/2, dyed with madrone bark.

While the warp skeins were in their dyepots, I mordanted the weft skeins, one for each scarf in the run. Normally when weaving scarves, I use a weft thread that's finer than the warp for maximum drape. But because there isn't a tencel thread finer than 30/2 available to the handweaver, I'm using a 60/2 silk. The mordant procedure for silk is simpler - just a scour bath and a mordant bath of potassium aluminum sulfate.
Here are the weft skeins:

From left, they are:
Logwood grey (Earthues extract)
Bloodwood (chips soaked in alcohol)
Eucalyptus (dried leaves broken into pieces, soaked in water overnight)
Koa wood (Hawaiian tree, chips soaked in alcohol)
Mulberry wood (chips soaked in alcohol) plus Quebracho Red (Earthues extract)
Don't ask what kind of Eucalyptus it was. I harvested the leaves a couple of years ago when a neighbor gave his hedge a crewcut. They've been drying in a box in the garage since then. Here's a picture of a couple of the dried leaves. They range from 1.5 to 4 inches in length and are a silvery blue/green. There are probably more different varieties of Eucalyptus than any other type of tree. This one is a mystery. All I can say is, the leaves dye yellow.

The skein on the right in the photo above started out as plain mulberry dye, but as you can see from this picture taken while it was in the dyepot, it was fairly close to the eucalyptus in hue, and I wanted more variation in the weft colors.

So I looked in my dye cupboard for another wood-based dye that would shift the color a bit. I had some small amounts of the various Quebracho extracts from a warp-painting class with Michele, so I added a gram or so of Quebracho Red to the bath, and got an apricot color I liked better than the yellow.
The Koa skein, second from right in the picture of weft skeins, really surprised me. The chips were dark red, as was the liquid they soaked in, so I expected a reddish color on the skein, not the deep bronzy gold I got. And there's a ton of color in just a small volume of chips! I had filled a quart jar about 2/3 full of chips and covered with alcohol. The jar sat in the garage for about a week. When I went to use it, I just poured the contents of the jar into a dyepot, added a quart or so of water, simmered the whole mess for a few minutes, strained it out into a clean dyepot, and added the yarn. The color took almost immediately, to very deep value, but to make sure it would really be color-fast, I left the dyepot at under 140F for several hours.
Carol Lee of the Sheep Shed Studio in Wyoming has done a lot of wood chip dyeing, and teaches a class on the subject. On Carol's advice, I kept all the dyebaths at a low temperature (around 140F) to prevent the colors from turning brown with excess heat. All, that is, except the walnut, which I boiled to kill off the various forms of life in the bucket and reduce the smell somewhat. I also strained it twice to get the sludge out of it. Walnut is a dye you don't want to do in the house. It's really stinky, especially when it's been fermenting for months!
I had hoped for a deeper brown from the walnut, as I've gotten in the past on protein fibers, but the tencel just wouldn't get any darker, even after 24 hours in the dyepot. I was glad I had done the iron bath, or it would have been an awfully light brown!
Both of the warp dyebaths were cooked on a propane camp stove out of doors. The weft skeins I cooked in the kitchen, although DH complained that the alcohol made the house smell like a hospital. Fortunately, the weather was pleasant so I could open windows to air the place out. I am really looking forward to having a proper dye kitchen, so I don't have to cope with a propane stove outside in a breeze, or worry about getting my indoor kitchen spattered with dye or smelly with witches' brew concoctions!
All in all, it was a very successful dye project. Now, if only I could get the weaving design to do what I want... In the meantime, another warp goes on the loom and I'll keep working on the wood design in my head while weaving something completely different.
Friday, June 19, 2009
More about Wood Dyes
In a comment on the previous post, Connie asked "So the denatured alcohol doesn't affect the fiber? I would think it did -- but then soda ash doesn't, except for silk, and it's pretty caustic."
The purpose of the alcohol is to draw the color out of the wood chips. Alcohol does this more thoroughly and faster than plain water. Once the liquid is a nice rich color, I dump the entire contents of the jar into a dyepot, heat gently (less than 140F), and strain the whole thing into a fresh pot. Then I add enough water so the dyebath is the right size for the amount of yarn I'm putting into it, add the mordanted yarn, and let sit.
The alcohol evaporates gradually as the dye does its magic. With the wood dyes, you never want the liquid to get hotter than 140F, so I either put the pot in the sun and don't heat it at all other than the solar effect, or in cool weather I get out the Salton warming tray and turn it to the "low" setting. Even that setting can sometimes get too warm, so I have to keep an eye on it and take the pot off the Salton if it gets too warm. Excess heat can have a negative effect on the resulting color.
I've used the alcohol-extracted wood dyes on silk and tencel, and can't detect any harshness to the fiber afterward. Not heating the dyebath probably helps prevent any possible damage. And the colors are glorious. See this post for a shot of the display board I made using thread wrappings next to the names of the wood that made the color.
I especially love the fact that the wood chips are a waste product - what's left after DH finishes turning the wood on the lathe, and he usually starts out with reclaimed, salvaged wood anyway. The chips go to the green-waste recycling facility eventually, I'm just using them to good purpose on their way to the recycler.
Monday, October 11, 2010
More Adventures in the Dyepot
One of the visitors to our Open Studios event, a man who belongs to the same woodturning club as DH, came bearing gifts: a bag of osage wood chips. I promptly filled a jar with chips, added alcohol, and almost immediately the liquid began turning a lovely clear yellow.

Today, I followed the advice of Neki and Deb, and altered the pH of the madder dyepot. First, while a new set of skeins of 60/2 silk were scouring and mordanting, I dumped all the ground madder bits that I'd saved from the previous batch, added water, and heated the whole pot to about 140(F). Then I let the pot cool, and poured the contents out through a strainer to remove all the solids. The solids went back into their jar, more alcohol was added, and the liquid is already turning a nice color:

As soon as the timer on the mordant bath went off, I put one of the skeins into the dyebath. The color was orange, so I added some dissolved soda ash to raise the pH. Still orange. More SA. Still orange, but with more of a red cast to it. More SA. I'll leave the skein until tomorrow, and decide if it the pH still needs to come up more.

The second skein went into a dyebath made from the liquid out of a jar of "old man's beard" lichen that covers the oak trees in areas where the fog comes in and raises the humidity level. It's been soaking in alcohol since just after we moved here (2.5 years?) and the alcohol had drawn out every bit of the mossy green from the lichen - it's now pale beige. I had expected the alcohol to turn the lichen rubbery and limp, but it's still crisp, just ghostly looking. I'll try to get a photo of the lichen "skeletons" tomorrow. In the meantime, this is what the yarn looks like with the lichen dye and a pinch of copper sulfate to intensify the color.

While all these things were happening in the dye kitchen, I finished sleying, tying on, and tensioning the Wood Series warp on the 24-shaft loom, and wove about 200 picks using the butterscotch gold skein dyed with Pink Ivory.

Thursday, June 18, 2009
Looking Even Farther Ahead
I haven't even finished winding onto cones the skeins of warp yarns for the next Water Series scarves, and already the warp after that is calling. Mostly because I have a big backlog of wood chips taking up real estate in the studio bathroom, waiting to become wonderful colors on yarn for a Wood Series project.
Here is the array of jars of chips (and a few other substances) soaking in denatured alcohol:

Some of these jars have been waiting patiently since we moved - well over a year ago now. No matter, there's still color in there!
Yesterday, I added to the array of jars, because DH had been turning candlesticks from California Pepper wood, and also made some bowls from a red-hued wood similar to Bloodwood. Maybe not the same species as bloodwood, but the chips were a lovely color. So I filled a couple of spare lidded containers with chips and poured in the alcohol:

You can see here how red those chips are. Well, no sooner had I re-capped the alcohol container and put a spoon into the jar of red chips than the liquid had already turned an incredibly rich color. This is perhaps 30 seconds after I poured the alcohol into the jar:

This will dye a color similar to madder - I may never have to buy madder chips again! The liquid in the jar of pepper chips didn't turn colorful as quickly. Today, it was a lovely amber but still quite pale. I've never dyed with it before, so I don't know how much color (or what hue) will come out of it.
One of the things I have found about dyeing with colors extracted from wood chips is that the color of the liquid isn't necessarily the color that will bond with the yarn. Some of what you see in the liquid turns out to be fugitive, with no intention of forming a permanent attachment to fiber. It looks one hue in the dyepot, and another when the yarn is washed.
Ah, the adventure of the dyepots!
Sunday, November 13, 2011
Q&A and Progress
In a comment on the previous post, Treena asked what type and strength of alcohol to use when extracting color from wood chips. Any clear alcohol will work: cheap vodka, everclear, moonshine, rubbing alcohol, or denatured alcohol (called methylated spirits in the UK and elsewhere, I believe). I find the latter is the least expensive, especially when purchased in big jerrycans from the big-box do-it-yourself stores like Home Depot and Lowe's.
If you haven't already done so, go to this page on my website and download the PDF about extracting color from wood chips.
To find wood chips, locate your local woodturners' club or a woodworker or furniture maker who specializes in exotic woods. These guys just throw the sawdust and chips away, so feel free to use it on its way to the green waste facility or its new life as mulch. Any wood that has a deep, rich color will make color on yarn or cloth. Usually it is a hue similar to the wood chips themselves, but there are enough surprises to make life interesting.
As for progress in the studio... I've been procrastinating about finishing Margreet's woven portrait. It's always a challenge to attach iron-on interfacing to a large piece of cloth and have the cloth hang really straight, and I kept putting it off until "later."
Today, I gathered my courage and a beautiful plaid wool blanket from New Zealand (which I brought home from a visit many years ago). I needed a large work surface on which to lay out the woven piece, and a gridded background would help to ensure the cloth was straight. I didn't want to use a hot iron directly on my big work table, but I thought that a wool blanked folded into quarters would protect the table from the heat and would give me grid marks for lining things up. Okay, just to be sure, I used a T-square from DH's workshop so the blanket itself was actually straight; it's cloth, too, right? and we know that cloth has elasticity :-)

With some degree of confidence, I used the iron to spot-attach the interfacing to the woven piece. I had to use two pieces, because interfacing typically only comes 16 inches wide; if you click the picture to enlarge, you might see the overlap about 1/3 in from the left side.
Then I took the woven piece plus tacked-on interfacing to the ironing board, and spent quite a long time counting off 10-second intervals, between which I moved the iron to a new place, until I had attached the interfacing firmly all the way down to about the top step in the image (you can see the piece just off the loom here). I've left it hanging from a rod overnight, and tomorrow I'll finish attaching the interfacing to the lower portion of the piece.
By the way, the cones of yarn in the upper left of the photo were all dyed with color from wood chips - the range of possible colors is amazing, and very washfast and lightfast. I've dyed silk, wool, and tencel very successfully. Have fun!
Thursday, October 07, 2010
Open Studios, Threading, and Other Pastimes
The San Luis Obispo County Open Studios Art Tour begins this weekend. We'll be open from 10:00 am until 5:00 pm Saturday and Sunday, October 9-10, and again the weekend of October 23-24 (same hours). If you're in the Central Coast area of California, please do drop by the studio. You can email me at sandra at 3springshandworks dot com for address and directions (it's easy - we're only 2 turns off Hwy 101, and only 1 turn off Hwy 41).
There will be woodturning demonstrations, and the jacquard loom will be up and running.
I'm hoping to finish threading the 24-shaft loom so I can show the difference between the patterning that's possible on a shaft loom compared to a jacquard loom. The warp is beamed:

And arrayed on lease sticks suspended behind the shafts:

And about two-thirds threaded:

The three warp colors together make a wonderful honey-blonde, which I think will be really lovely in the woven cloth.
While I thread, and listen to classical music on the iPod, I've got a skein of 60/2 silk soaking in a madder dyebath at room temperature.

I had hopes for a redder hue, based on the color of the liquid in the jar while the ground madder chips soaked in alcohol, but it's turning out to be the brick-orange hue, not red-red.
This is the second extraction from the ground madder, but the first alcohol extraction. I saved the dyestuff, and will try another alcohol extraction in an attempt to get that red-red. There's definitely still a lot of color in the material, so maybe it will just take more time to get the orange out and reach the mythical reds.
I'm hesitant to try shifting the pH, because often the resulting color will shift back again if the article is washed at a higher pH. If I can't depend on the color to stay a particular hue, it's difficult to sell to a customer and promise that the color she sees on the scarf is the color that will be there after the scarf is laundered. My tap water is slightly alkaline, like most laundry conditions, so I can be fairly sure that what's there now will be there after laundering.
Oh well, the brick orange will work well with the warp colors...
There will be woodturning demonstrations, and the jacquard loom will be up and running.
I'm hoping to finish threading the 24-shaft loom so I can show the difference between the patterning that's possible on a shaft loom compared to a jacquard loom. The warp is beamed:

And arrayed on lease sticks suspended behind the shafts:

And about two-thirds threaded:
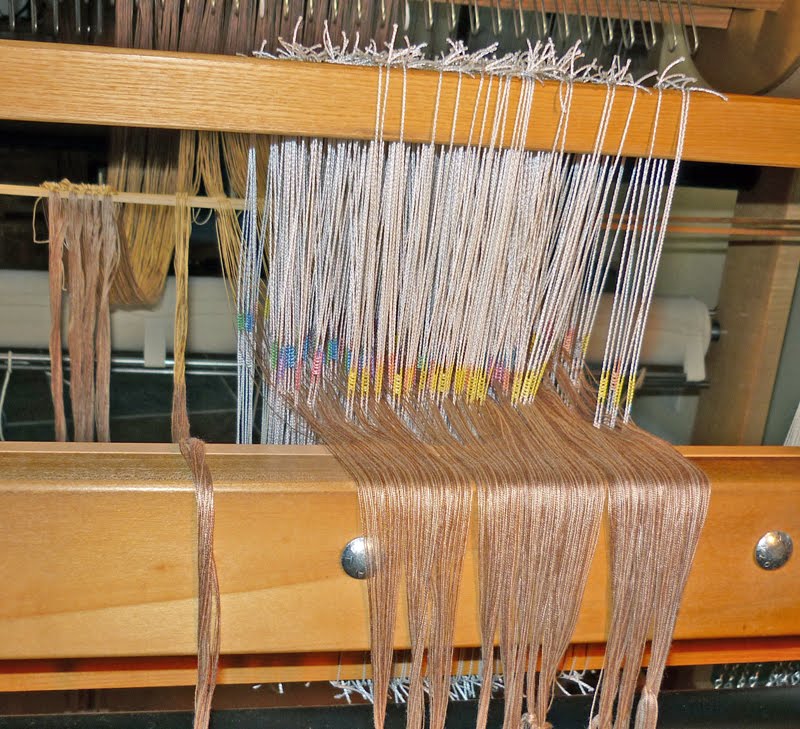
The three warp colors together make a wonderful honey-blonde, which I think will be really lovely in the woven cloth.
While I thread, and listen to classical music on the iPod, I've got a skein of 60/2 silk soaking in a madder dyebath at room temperature.

I had hopes for a redder hue, based on the color of the liquid in the jar while the ground madder chips soaked in alcohol, but it's turning out to be the brick-orange hue, not red-red.
This is the second extraction from the ground madder, but the first alcohol extraction. I saved the dyestuff, and will try another alcohol extraction in an attempt to get that red-red. There's definitely still a lot of color in the material, so maybe it will just take more time to get the orange out and reach the mythical reds.
I'm hesitant to try shifting the pH, because often the resulting color will shift back again if the article is washed at a higher pH. If I can't depend on the color to stay a particular hue, it's difficult to sell to a customer and promise that the color she sees on the scarf is the color that will be there after the scarf is laundered. My tap water is slightly alkaline, like most laundry conditions, so I can be fairly sure that what's there now will be there after laundering.
Oh well, the brick orange will work well with the warp colors...
Friday, December 21, 2007
Postscript to Last Post
I should add this to the information in the last post:
On one warp of three shawls, I used a weft thread that was dyed (not by me) in very long color sequences. So if you read the post describing those shawls, yes, there was a gradated yarn.
However, the weave structure was the same as I described in the last post. The color changes in the weft made the final result look even more complex than if I used a solid-color weft.
I'll be leaving for a 5-day holiday break, so the blog will be on hiatus until I return. I'll post more pictures of yarn being dyed with wood dyes next week.
Here's a teaser:

This is a jar of brasilwood (Haematoxylon brasiletto) chips that I bought many years ago. It's been sitting in a cupboard until last Monday, when I put about 4 ounces into a jar and poured alcohol over it. It's been soaking 5 days now. You can see how much color the alcohol has extracted from the chips. Another 5 days, and it'll be just about ready to dye with. It'll be gorgeous on weft thread!
I've discovered that the Salton warming tray we got as a wedding gift some 26 years ago keeps a dyepot at the perfect temperature for long, slow dye runs. I've used it more now in the past month than we did in the entire 26 years since we received it!
Happy holidays to everyone! More pictures next week.
Monday, December 31, 2007
The Latest Wood Dyes
We've had damp, rainy weather, so it's taken a few days for the skeins to dry, but they're finally ready to be photographed. In the dry season (which is about 9 months of the year here), I would just hang them outdoors and let them air-dry; instead, they hung indoors.
The two warp skeins, which I photographed while in the dyepot and posted on December 17, dried much too pale, so I overdyed them to a darker color. This time I added mordant to the dyepot because I didn't want to subject the skeins to yet another immersion process by mordanting them separately (too much risk of tangling).

The skein on the left (100% tencel) was originally dyed with redwood chips to a pale peach. I overdyed it with brasilwood (about which more later) to a sort of dusty rose color.
The skein on the right (80% tencel, 20% silk) was originally dyed with chips and shavings of an unspecified tropical hardwood to a light beige. I overdyed with walnut sawdust and chips to a darker but similar hue.
The weft skeins were a real revelation. Remember the jar of brasilwood shavings I posted on December 21? When I put the chips and liquid into a dyepot, added some water, and simmered for a few minutes, the liquid turned the most incredible deep dark purplish red. Here's a look at the results:
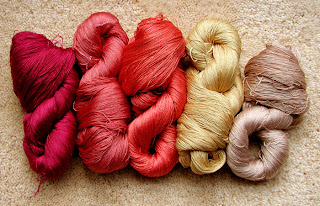
From left, all on 60/2 silk:
1. Brasilwood chips alone, about 1/3 of the liquid obtained from simmering the chips.
2. Brasilwood chips, another 1/3 of the liquid, plus fustic extract (which dyes bright gold-to-brown, depending on concentration).
3. Brasilwood chips, the last 1/3 of the liquid, plus osage orange extract (which dyes vivid yellow).
4. Eucalyptus leaves. Different variety than I used last time, and the color is also somewhat different. The leaves were simmered several days before Christmas, then left to soak in a covered pot outdoors until several days after Christmas.
5. Walnut chips, second bath.
The rosy warp skein was dyed in the leftover baths from 1, 2, and 3. A heck of a lot of color for about 4 ounces of brasilwood chips that soaked in alcohol for about a month. Apparently, the first use of baths 2 and 3 absorbed the second color from each, leaving mostly brasilwood red for the warp skein to absorb.
I've heard that the brasilwood dye is more colorfast when extracted with alcohol than when extracted in water. I plan to do a light test on a small portion of the thread to be sure - the rain has finished for a few days, so there's sun to spare.
The weaving draft is still in the fine-tuning stage. I'll post a screenshot later, probably after the New Year.
The two warp skeins, which I photographed while in the dyepot and posted on December 17, dried much too pale, so I overdyed them to a darker color. This time I added mordant to the dyepot because I didn't want to subject the skeins to yet another immersion process by mordanting them separately (too much risk of tangling).

The skein on the left (100% tencel) was originally dyed with redwood chips to a pale peach. I overdyed it with brasilwood (about which more later) to a sort of dusty rose color.
The skein on the right (80% tencel, 20% silk) was originally dyed with chips and shavings of an unspecified tropical hardwood to a light beige. I overdyed with walnut sawdust and chips to a darker but similar hue.
The weft skeins were a real revelation. Remember the jar of brasilwood shavings I posted on December 21? When I put the chips and liquid into a dyepot, added some water, and simmered for a few minutes, the liquid turned the most incredible deep dark purplish red. Here's a look at the results:

From left, all on 60/2 silk:
1. Brasilwood chips alone, about 1/3 of the liquid obtained from simmering the chips.
2. Brasilwood chips, another 1/3 of the liquid, plus fustic extract (which dyes bright gold-to-brown, depending on concentration).
3. Brasilwood chips, the last 1/3 of the liquid, plus osage orange extract (which dyes vivid yellow).
4. Eucalyptus leaves. Different variety than I used last time, and the color is also somewhat different. The leaves were simmered several days before Christmas, then left to soak in a covered pot outdoors until several days after Christmas.
5. Walnut chips, second bath.
The rosy warp skein was dyed in the leftover baths from 1, 2, and 3. A heck of a lot of color for about 4 ounces of brasilwood chips that soaked in alcohol for about a month. Apparently, the first use of baths 2 and 3 absorbed the second color from each, leaving mostly brasilwood red for the warp skein to absorb.
I've heard that the brasilwood dye is more colorfast when extracted with alcohol than when extracted in water. I plan to do a light test on a small portion of the thread to be sure - the rain has finished for a few days, so there's sun to spare.
The weaving draft is still in the fine-tuning stage. I'll post a screenshot later, probably after the New Year.
Tuesday, May 26, 2015
Another Jar Full of Happiness
Today, a woodturning buddy of DH's came over to borrow a chainsaw so he could cut a huge manzanita root ball into turnable chunks. As fate would have it, there was a copious supply of sawdust on the pavement where the men were working. As a dyed-in-the-wool (pun intended) lover of color and also of free stuff) I did not hesitate to gather up the sawdust and put it into a jar with alcohol. This my first time working with manzanita, which is a very hard, very beautiful red-brown wood. It's going to make seriously gorgeous color:


Color, glorious color! I'm thinking a run of scarves with an interleaved threading... I have plenty of wood-dyed yarns for weft, in lots of different hues...

The photo above was taken just a short time after I poured in the alcohol; the clear liquid became colorful immediately. Just to see how it compares with the redheart chips that have been soaking for about a week (posted here), I dipped paintbrushes into the liquid in both jars, and this is the result on watercolor paper:

Wednesday, December 23, 2009
Today's Dyepots
The goddess of the dyepots was kind, and gave me these:

The yarn is 20/2 Tencel, mordanted with 5% WOF aluminum acetate.
From left, the dyes are:
Monterey cypress chips, soaked for many months in alcohol. The yarn is about the same color as the chips (there's a photo here). I may decide to overdye to darken the color a little bit.
Walnuts harvested in May, when the hulls are still green and soft, and the nut mostly jelly. No shell has developed yet, so it's easy to chop the whole thing. I soaked the pieces in water until now, although in maybe September I strained off the brown liquor because the solids and particulates began to rot and smell really foul. Before dyeing, I scooped out a thick layer of green fuzzy mold, and boiled the liquid briefly to kill off anything else alive in there. I wanted a medium value, so didn't leave the yarn in the bath as long as I would have if I wanted dark brown.
Cocobolo chips, soaked for many months in alcohol. Cocobolo is a Central/South American member of the rosewood family, with distinctive stripes of red-brown and dark brown (you'll find a photo of the wood here) . The yarn stayed longer in the dyepot than the wool I posted about a couple of days ago, so it got darker but didn't take as much of the red hue as the wool. Protein and cellulose really grab different components of a plant dye.
Overall, I'm pretty happy with these colors. I wanted a light, a medium, and a dark value for a series of hangings I plan to weave on the 24-shaft loom. The draft will have an interleaved threading with three different design lines, each threaded in a different value. More information and pictures as the project progresses, and weft yarns hit the dyepot.
Tuesday, October 12, 2010
Usnea Lichen
Like all lichens, usnea is a symbiotic composite consisting of a fungus and an algae. Because of the appearance of the material after it soaked in alcohol for over 2 years, I suspect that the alcohol dissolved the algae, along with its chlorophyll, leaving behind the structural material of the fungus.

My belief is partly based on the similarity between the color I got from the lichen (see below), and the color obtained from the chlorophyll extract I got from Michele Wipplinger years ago.
And how's this for day-glo orange?

The soda ash definitely intensified the madder, although it didn't ever get to red. I put another skein in that same dyepot this morning, with a little more soda ash, but it's looking like it's going to be browner than the one in the photo above.
Silk generally prefers an acid environment, but as long as no heat is applied, it'll be okay in this alkaline bath.
Wednesday, September 03, 2008
Playing in the Mordant Pots
Many years ago, at a long-past conference, I purchased some alkanet root from Maiwa Handprints, a purveyor of many interesting things including natural dyestuffs, located in British Columbia. After much experimentation extracting dye from wood chips or other woody materials, I decided to do a test with the alkanet. Alkanet is a root, like madder, but unlike madder it has a papery outer covering on the roots. I don't know if the colorant is in the covering or in the roots themselves. Someday I'll buy some more and see if the outer covering by itself makes as powerful a dye as using both together.
Lots of dye books describe the results of a conventional alkanet dyebath, with widely differing processes, lightfastness, and resulting colors, which range from grey to purple to brown. Some of the recipes I read advised using a 4:1 ratio of dyestuff to fiber.
What I did was put my 2-ounce package (about 56 gm) of alkanet into a jar and covered it with alcohol for a couple of days. The dye liquor turned a very deep red-violet:

When I saw how thoroughly the liquor stained the spoon, and my grey nitrile gloves, I was sure it would do something interesting on silk. (The spoon won't come clean, even with a cleanser containing bleach.)


You'll notice the spoon stained red, the gloves purple.. Hmmm.
I made 3 skeins of 60/2 silk, each weighing about 30 gm. Each skein went into a different mordant pot:

Left front, copper; right front, tin plus cream of tartar; back, alum. You can see the alkanet chips in their alcohol soak to the left of the stove.
This shot shows how the silk took up the copper mordant:

After mordanting, the skeins will go into a single dyebath, with hopefully 3 very different colors coming out of the dyebath. I don't usually do the multi-mordant/single-dyebath routine, but since I've never worked with alkanet, it seemed like a good thing to try. Also, I'll do some lightfastness testing afterward, to see how the differently-mordanted alkanet holds up under the bright California sunlight.
More tomorrow, after the next step of the process - aka, playing in the dyepot!
Tuesday, March 01, 2011
Wood Dye
In a comment on the previous post, Dolores said " Can't wait to see how the dye turns out!"
I hope you have a lot of patience! Because that's what's required for the wood dyes. If you read the procedure in the PDF linked here on my website (5th item down on that page), you'll notice that I say "weeks is good, months is better" when talking about how long the dye material should soak in alcohol.
The wait is worth it, though, because the colors from wood are just glorious:

The browns are easy to understand when contemplating dye from wood material. But all these colors are possible. The burgundy red, of course, is brasilwood. The screaming gold is black locust - a real surprise, because the wood itself looks like maple, blond with a faint yellow streak. The peaches are from bloodwood. The bronzy colors come from koa or black acacia (they're related, and the colors are similar). The pale gold is eucalyptus leaves (okay, not actually wood, but still, it came from a tree). The greys are mostly iron on top of the tannin from the wood source material; usually, the wood color was either insignificant or fugitive, so I added iron to darken and grey the yarn.
This is only a small sampling of the colors I've gotten from wood dye. But it's "slow cloth" for sure! You can't hurry the extraction process, and you can't hurry the dye process by heating, or you dull or lose the color altogether. I've got jars in the studio that have been soaking since a year or two before we moved here (which was almost 3 years ago, now).
A couple of the russet brown skeins in the middle of pile are dyed with cocobolo, but the darker variety. Apparently, the highland cocobolo is dark, and the timber growing nearer sea level is more orange. We have a friend who exhibits at quite a few of the shows we do, who works almost exclusively with the darker cocobolo, so I've got a good source for that; the recently acquired stuff is from coastal timber and I've never tried it before.
Eventually, you'll see pictures posted here from the wood chips that were recently set to soaking in alcohol, but it'll be a wait. Stay tuned!
Thursday, May 28, 2015
Dyeing with Wood Chips
In a comment on my last post, Denice asked what type of alcohol I use to soak wood chips in to extract color. It's denatured alcohol, available in large cans at Home Depot/Lowe's or any other hardware store - sold for stripping paint and finishes.
If you click on over to the Extra Features page on my website, you will find a link to a downloadable PDF file that describes the procedure I use to dye with wood chips.
Just to show you the range of colors that can be achieved with wood chips, here's a photo I took some years ago. All are from wood chips. I must admit that some of the grey/silver tones are wood that didn't give much color, so I added a tiny amount of iron to the dyepot to shift a blah beige to grey.

Tuesday, December 22, 2009
Wood Chip Dye
Now isn't this an absolutely gorgeous color!

This is white worsted-weight wool, mordanted with 12% WOF alum (potassium aluminum sulfate), and dyed in color extracted from cocobolo sawdust and chips. These skeins are a gift to the wife of the woodturner who gave me the chips - she bought a rigid heddle loom from me during a studio clear-out, and this is a reasonable size yarn for a new weaver to work with. I have a couple of skeins of tencel yarn for my own use in the dyebath too. They probably won't take the color as richly or as dark - we'll see when they are "done."
I've also got skeins working in dyepots of walnut hulls (harvested and chopped in May while the hulls are still green and the nuts mostly jelly, and fermented in water since then) and Monterey cypress sawdust and chips soaked in alcohol. When they're rinsed and dried, I'll post more pictures.
There's a link to a downloadable PDF file on my website here that describes the procedure I use to get color from wood chips. If you know a local woodworker, the shop waste product is a wonderful source of color, and a surprisingly broad range of colors, too.
Saturday, November 12, 2011
Cocobolo In the Dyepot
Cocobolo is a hardwood tree common in Central America. I've dyed silk and Tencel in the past using the sawdust and chips of the highland variety of cocobolo. Back in February of this year, I was gifted with a bag of sawdust and chips of the lowland variety, which has a redder cast to it than the highland type. The chips have been soaking in alcohol since then, and yesterday finally made it into a dyepot with some knitting wool, which will be given back to the woodturner who gave me the chips. The yarn is intended for a holiday gift for his daughter, who has visited the studio and was fascinated with the looms and also with the jars of soaking wood chips.

The color is similar to a rusty madder orange, not as brown as the highland cocobolo I've used in the past.

The color is similar to a rusty madder orange, not as brown as the highland cocobolo I've used in the past.
Tuesday, May 19, 2015
A Jar Full of Happiness
Late last week, DH gave me a box of wood chips from a chunk of redheart he'd been working on. I put it in a 2-quart jar and covered the chips in alcohol. After just a few days, the liquid is a deep coppery orange. It will make a gorgeous peachy pink on silk (I've dyed with it before, and loved the results).


There are lots more flowers coming - the fuzzy brown balls are unopened buds.

I'll leave it alone for a few weeks to extract as much color as possible from the chips, then get a hank or two of 60/2 silk into a mordant pot so they're ready to be introduced to their future color.
And it's that time of year again: the peanut cactus is blooming its little heart out in the courtyard, in a cheerful bright orange hue:

There are lots more flowers coming - the fuzzy brown balls are unopened buds.
Sunday, September 30, 2007
Threading the Water Warp
The task of threading the water warp through the heddles is progressing, although not quickly. The weather has turned cooler, and I find my back bothers me if I sit too long threading. Here's where I've got to so far - about 7 sections done out of a total of 10.

In between time spent threading, I'm getting a head start on the next project. On Friday, I wound off skeins of 30/2 Tencel warp for another woodgrain series. On Saturday, I dyed the skeins, and today, I wound and mordanted 60/2 silk for the weft.
The warp is going to be yet another interleaved threading, alternating dark brown and tan. This year, for the dark brown, I used fresh walnuts, as opposed to nuts that had been fermenting over a year. The hulls were still green when I picket them. I scored the hulls with a paring knife, threw the nuts into a dyepot, and covered them with water. That was about a week ago. I poured off the liquid into another pot, put in fresh water, and boiled the nuts for about half an hour, then added that liquid to the original batch. This time, the yarn was the depth of shade I wanted - really deep, rich brown.
The light warp was dyed with cutch (the Earthues extract) to a light caramel color with overtones of peach.

And here are the weft skeins in their mordant bath. It'll be a long, cool mordant process. I started by dissolving the alum in boiling water, added it to a pot full of very hot water, and put the skeins in. They're going to sit there until I've got the dyestuffs ready, later in the week.
Today the pot gets stirred whenever I remember to do it, and starting tomorrow just once or twice a day. By "stir" I mean lift the rings the skeins are looped on up and down a couple of times. With fine thread, putting a spoon or other stirring stick into the pot practically guarantees tangles, so once the thread goes in, the liquid is only moved around by raising and lowering the skein.

The rings are made of heavy copper wire, which is inserted into lengths of plastic tubing. The ends of the tubing are sealed with a plumbing compound called "Goop" which keeps the liquid from getting in and leaching copper out into the pot, where it could affect the dye color (especially with natural dyes). The rings rest on a long, non-stick-coated barbeque skewer (a wood dowel would work, too) so they are easy to grab.
Now to see what sawdust and wood chips I can steal from DH's woodworking shop... I have one batch that's been soaking in denatured alcohol in a canning jar for a couple of weeks, and the liquid is a surprising shade of greenish tan. It'll be interesting to see what color bonds to the fiber!
Subscribe to:
Posts (Atom)