It's been a long and frustrating Monday, but it ended well!
DH spent a long stretch of the day on the phone with the lead engineer at AVL, being talked through various adjustment/fine tuning/replacement procedures. When he got off the phone, there was still one stubborn hook on one module that misbehaved in a consistent, repeatable pattern.
After much grumbling and swearing from both of us, DH finally tried unhooking the heddle and reattaching it after making sure the attaching assembly had no twists in it. Voila! As if by magic, the one misbehaving heddle began to work correctly.
I was able to run the loom through the first part of the "threading" file, described here, which lifts one heddle at a time so that I don't grab any heddles out of order while threading. Actual threading will start tomorrow. The warp I wound over 2 weeks ago will finally get to do something besides look tidy on the sectional beam.
Hooray! A celebration is in order!
Monday, November 30, 2009
Saturday, November 28, 2009
Our Lady of the Angels
During our visit to relatives in Los Angeles, we took a side trip to visit the main cathedral in LA, Our Lady of the Angels. The cathedral has some wonderful jacquard wall hangings designed byCalifornia artist John Nava and woven at a mill in Belgium. (I hesitate to call them tapestries, because jacquard weaving isn't true "tapestry," which is defined as having discontinuous wefts and a warp that doesn't show.)
There is a series of 7 panels in the front of the cathedral, behind the altar; 2 groups of panels, 25 in all, on either side of the nave; and another series of 5 panels at the back of the nave, over the baptismal font. All the panels are huge - up to 7 feet wide and 40-some feet tall.
Here's an overall shot of one group of the panels on the sides of the nave. I left the people in the foreground to show scale.

And a close-up off another panel:

The faces are deliberately modern-looking - appropriate in an architecturally modern cathedral - a few based on the artist's family members, others on photographs or death-masks of the saints being portrayed, and others on models recruited by a Hollywood casting director because of their resemblance to portraits of the saints. I was interested to see the fine black line around faces and hands that brings them into sharp focus against the background.
The background textures of the hangings are wonderful. The effect is of aged, weathered frescoes, and in one case, according to the church literature, based on "actual scans of excavations of the Via Dolorosa in Jerusalem."

More detailed information about the artist and the wall hangings can be found here.
Tuesday, November 24, 2009
Studio Shaping Up
Almost all the construction work on the Jacq3G is done. Several pieces of auxiliary equipment have been attached, including lamps front and back, holders for the sectional warping tension rack (only used when winding from cones or spools directly onto the beam, not with the warping wheel), etc. The computer is installed and connected, working properly, and running JacqPoint, the software that drives the loom.
Here's a view from the back and one from the front:


The shipping paper is still on the sandpaper beam, and will stay there until I'm ready to thread and sley the reed.
Still to be designed and constructed are some sort of cloth pouches for the keyboard and mouse. They're wireless, and only the mouse is likely to be used frequently; it'll hang from the side frame somehow, with a small clipboard to use as a mousepad, and the keyboard will hang on the wall behind the chair.
We're still waiting for a couple of Jacq3G parts to replace things that don't work, so I'm not ready to thread the loom - replacing some things is best done on an undressed loom!
I finished inserting the section hoops into the sectional beam that came with the Jacq3G, and the beam is now happily residing on the 24-shaft loom. I think it will just stay there - no reason why not.

In any case, we're off tomorrow to spend Thanksgiving with family, so next week will have to be soon enough. I hope you all have a happy holiday!
Sunday, November 22, 2009
Designing Weavers Annual Show & Sale
There were more fibery goodies than you could shake a stick at. From tiny pine-needle baskets (smallest ones were about 1 inch in diameter):

to fiber jewelry:

and small wedge weave and other tapestries by Michael Rohde:

to garments in every color:

especially red:

and some familiar looking scarves, with some other artists' work mixed in:

If you missed this year's event, just put the weekend before Thanksgiving on your calendar for 2010.
Thursday, November 19, 2009
Ta Dah!
We have power! And heddles going up and down!
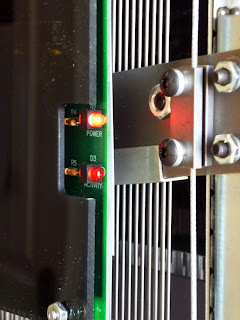
The upper LED lights when power is on; the lower one lights when the module receives data from the computer.
I feel really good about the progress we've made. After all, the loom only arrived on Monday afternoon!
We spent much of the afternoon doing trouble-shooting and debugging. There are a few adjustments that have to be made to ensure the knives are at the right level when they start to move, otherwise the hooks at the back of the module don't catch on the knife.
A few hooks don't seem to be behaving themselves - a hard-to-diagnose situation where on one module, some of the even numbered hooks don't work when they should rise, but are happy when they should sink (this is a countermarche-action loom - when a shed opens, some threads rise and others sink).
DH also installed the computer, and mounted the flat-panel monitor on the top front crossbar, so I don't have to twist my back to see what's happening on the JacqPoint display.
The computer is at the back of the loom - it'll probably live on top of the jacquard control box.

Plus, we needed to do more heavy lifting. I apparently misjudged the clearances between the worktable and the new loom, and between the new and old looms. It was nigh unto impossible to squeeze between, and I'd rather have several access paths available. So we moved the white worktable back farther toward the corner so it's possible to fit between the table and the jacquard, and rotated the 24-shaft loom so it will be possible to walk between it and the jacquard on one side, and between it and the wall on the other side.

And that's it for today. I'll be away for a couple of days, leaving DH to communicate further with AVL about the remaining issues.
If you're anywhere in the greater Los Angeles area this weekend, and need a really mouthwatering fiber fix, check out the Designing Weavers annual show and sale (see here for details). Fiberholics, unite!
Wednesday, November 18, 2009
Another Busy Day
We got a lot done again today.
First, folks, this is the business end of the array of solenoids on each jacquard module:

Each solenoid is maybe 1/4-inch wide. There are 120 of them on each module. What you see from this angle is not actually the solenoids themselves, but rather the spring and pin on the end of each solenoid. The cables leading to the heddles go through the end of the spring assembly, and when the loom driver says to pop the solenoid, the cable is pushed into position to be grabbed by the "knife" that lifts or lowers the heddle.
Anyway, what we accomplished today centered first around the double-box fly-shuttle beater. It took an inordinate amount of time, but then it's a complicated piece of equipment.
I've never actually used a double-box fly-shuttle beater. It has a completely different means of throwing the shuttle. The single-box beater (which I have on the 24-shaft loom) has a side-to-side pull cord. The double-box (or 4-box) beater has a downward pull cord. This will be a new learning (actually, muscle-training) experience for me. A good time to train myself to pull with the left hand, and give the right hand a break :^)
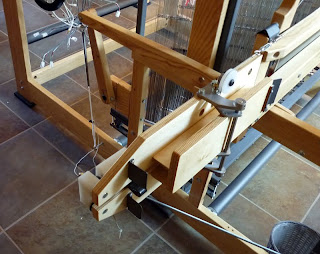
Also, today we installed the sandpaper beam, the cloth storage system stuff, and the auto-advance hardware. In this picture, you can see the sandpaper beam and the forward cloth storage pulley The sandpaper beam is still wrapped in its shipping paper - we don't need to sandpaper our hands or arms quite yet.

As of dinner time, the E-lift motor (the red thing hanging off the right side of the loom) is installed, the Dial-a-Sett chain is in place, and all the jacquard module power and data cables are connected to the control box (the huge grey box on the floor in the picture below):

The control box is larger than it needs to be, but when I add more jacquard modules, part of the empty real estate inside the box may be occupied by an additional power supply.
Tomorrow, we will probably power up the control box and start testing the jacquard modules. They can be tested without having the warp threaded and ready to weave. We just want to watch individual heddles rise and fall in accordance with a test file. Probably the first file will be the one I posted a few days ago, which lifts one heddle at a time. That should tell us if all the solenoids are firing as expected.
First, folks, this is the business end of the array of solenoids on each jacquard module:

Each solenoid is maybe 1/4-inch wide. There are 120 of them on each module. What you see from this angle is not actually the solenoids themselves, but rather the spring and pin on the end of each solenoid. The cables leading to the heddles go through the end of the spring assembly, and when the loom driver says to pop the solenoid, the cable is pushed into position to be grabbed by the "knife" that lifts or lowers the heddle.
Anyway, what we accomplished today centered first around the double-box fly-shuttle beater. It took an inordinate amount of time, but then it's a complicated piece of equipment.


I've never actually used a double-box fly-shuttle beater. It has a completely different means of throwing the shuttle. The single-box beater (which I have on the 24-shaft loom) has a side-to-side pull cord. The double-box (or 4-box) beater has a downward pull cord. This will be a new learning (actually, muscle-training) experience for me. A good time to train myself to pull with the left hand, and give the right hand a break :^)
Also, today we installed the sandpaper beam, the cloth storage system stuff, and the auto-advance hardware. In this picture, you can see the sandpaper beam and the forward cloth storage pulley The sandpaper beam is still wrapped in its shipping paper - we don't need to sandpaper our hands or arms quite yet.

As of dinner time, the E-lift motor (the red thing hanging off the right side of the loom) is installed, the Dial-a-Sett chain is in place, and all the jacquard module power and data cables are connected to the control box (the huge grey box on the floor in the picture below):

The control box is larger than it needs to be, but when I add more jacquard modules, part of the empty real estate inside the box may be occupied by an additional power supply.
Tomorrow, we will probably power up the control box and start testing the jacquard modules. They can be tested without having the warp threaded and ready to weave. We just want to watch individual heddles rise and fall in accordance with a test file. Probably the first file will be the one I posted a few days ago, which lifts one heddle at a time. That should tell us if all the solenoids are firing as expected.
Tuesday, November 17, 2009
A Busy Day
We got an early start and accomplished a lot today, ably assisted by a friend (thanks, Phil!!) who came for a couple of hours to help with the heavy lifting part - tilting the jacquard frame up onto its feet and bolting it to the wood frame. Sounds easy and quick; in practice, not so much.

Then DH spent some time leveling the feet of the jacquard frame - sort of like leveling a refrigerator, only heavier!

Then we began hanging the jacquard modules from the frame and connecting the lifting cables to the pulleys overhead. It's like anything complicated, you do it one step at a time. Here's the first module in place:

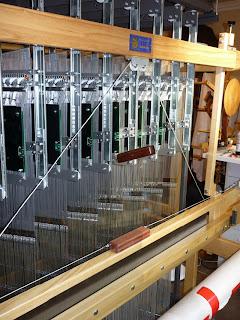
I won't bore you with pictures of each module going up, instead I'll just cut to the chase. Here's the frame with all 8 modules in place:

After that, things seemed to go fairly quickly. The next step was connecting the birds' nest of cables - one power cable and one data cable for each of the modules. At first, it looked a right mess:

Which was gradually tamed with cable ties, first securing the cables to their respective modules in a tidy way, then routing them overhead to a handy "cable routing bar:"

After the cables, we began to install the fun stuff, like beams:

And crossmembers with nameplates:

And now I need a drink, some ibuprofen, dinner, and a soak in the hot tub. In that order! More progress tomorrow.......

Then DH spent some time leveling the feet of the jacquard frame - sort of like leveling a refrigerator, only heavier!

Then we began hanging the jacquard modules from the frame and connecting the lifting cables to the pulleys overhead. It's like anything complicated, you do it one step at a time. Here's the first module in place:

I won't bore you with pictures of each module going up, instead I'll just cut to the chase. Here's the frame with all 8 modules in place:

After that, things seemed to go fairly quickly. The next step was connecting the birds' nest of cables - one power cable and one data cable for each of the modules. At first, it looked a right mess:

Which was gradually tamed with cable ties, first securing the cables to their respective modules in a tidy way, then routing them overhead to a handy "cable routing bar:"

After the cables, we began to install the fun stuff, like beams:

And crossmembers with nameplates:

And now I need a drink, some ibuprofen, dinner, and a soak in the hot tub. In that order! More progress tomorrow.......
Monday, November 16, 2009
Drum Roll, Please!
This, my friends, is what a jacquard loom looks like:

The trailer is parked at the bottom of the driveway. Bob Kruger (on the left) had lost a trailer wheel on the way here, so the trailer couldn't be persuaded to go up the steep driveway. Which meant all the pieces had to be schlepped up the drive to the garage, before being schlepped up the stairs to the studio.
The side frames are pre-assembled; the sectional beam is pre-assembled (except for the section hoops); parts of the jacquard frame are pre-assembled; everything else is just a giant leggo set waiting for DH to get started.

Here, DH is contemplating the top and bottom assemblies of the jacquard frame. The top assembly (closest to the camera) weighs about 200 pounds; the whole frame, bolted together, will weigh nearly 280 pounds.

This is as far as we got this evening - the jacquard frame is all bolted together, but it'll take some extra assistance to get it tilted upright, which will have to wait until tomorrow.
Sunday, November 15, 2009
Decks Are Cleared...
The warp is beamed. Here's the last of 40 sections winding onto the sectional beam:

And from the warping-wheel-eye view:

After I finished that, I had time before dinner to weave the last couple of inches of the second Pendleton selvedge rug that's on the Glimakra. Here I've finished weaving the selvedges, added a hem using the warp yarn doubled, and a header of waste rag strips, to keep everything in place until I can cut the rug off the loom, move it a couple of feet to the sewing machine, and zig-zag the hem edge.

The hem will be finished by attaching a strip of double-fold seam binding, turning the hem under twice, and stitching again. At least, that's the plan.
Hemming both rugs might have to wait for a while, because the reason today was deck-clearing day is that the jacquard is supposed to arrive tomorrow!
Stay tuned...............................
Saturday, November 14, 2009
Beaming the First Jacquard Warp
Don't get too excited - the loom is not here yet! It should arrive on Monday. In order to be ready to weave the instant it is assembled, I'm winding a warp on the 24-shaft loom. Both looms have the same size frame, so the beams can move from one loom to the other.
Before I began winding, however, I had to measure and attach a lot of new apron strings. I usually weave scarves on the 24-shaft loom, so there were only about 20 apron strings on the beam. This test warp is black 10/2 mercerized cotton, sett at 24 ends per inch, which means a 40-inch-wide warp.
The apron string serves the same function as a cloth apron, but the sectional beam needs an apron for each section. They all must be the same length, or some of the sections will be too far forward or too far back (relative to the others) which means wasting yarn.

In the picture, I'm just finishing winding from the warping wheel to the 4th (rightmost) section.
Once this warp is woven, I'll put on 20/2 cotton, probably sett at 60 ends per inch. I made a table listing the setts and width in inches that can be wound on the sectional beam with equal 1-inch sections, for warps that use all 960 hooks.
epi width
20 48
24 40
30 32
32 30
40 24
48 20
60 16
64 15
80 12
For setts other than these, I'll need to use the plain beam and a raddle for warping.
Thursday, November 12, 2009
Loom for Sale

Glimakra Ideal Loom (39 inch) with horizontal countermarche setup, 8 shafts, 10 treadles. See the Glimakra USA website for specifications and detailed information about this model.
Includes:
1000 heddles, bench, rubber feet, lease sticks (pair), warp sticks (24), 4 stainless steel reeds (6, 8, 10, and 12-dent), 2 raddles (one built in, one bolts on), 3 Glimakra ski shuttles, 2 stick shuttles, Toika metal temple (16-24”), Glimakra wood temple (32-51”), extra Texsolv cord, anchor pins and arrow pegs.
Optional Equipment:
Simplified Countermarche Tie-up System (as documented by Peter Collingwood). Includes cords, board, nuts & bolts, and metal separator bar. Add $200 to loom price.
For reference, see the 20+ Device at www.woolhousetools.com – they manufacture a commercial version of this tie-up system.
Details:
Asking $1,300 for the loom and accessories. Optional tie-up system $200 additional.
The loom is located in San Luis Obispo County, California. I really don’t want to crate and ship it. I’ll deliver within California for the price of gas (and help reassemble it), or you can pick it up. Disassembled, it should fit in most mid-sized or larger cars (compact or smaller would be tight unless you can remove seats).
The loom was second-hand when I bought it, and according to Joanne Hall of Glimakra USA, probably built in the early 1980s. It was my primary loom from 1993 to 1997, but hardly used after that. I’m selling it to make room in the studio for the jacquard. The Glimakra is a great loom – as good for rugs as for fine threads.
If interested, contact me by email (sandra at 3springshandworks dot com). If anyone in your local guild might be in the market, please feel free to pass along the link to this post.
Happy weaving!
Wednesday, November 11, 2009
The Rearranged Studio
Before we got distracted by the drama of the deerstalkers, we did some major heavy lifting in the studio. Fortunately, the local DIY store has nice pads that go under the feet of heavy furniture, so you can just slide it into place. It still takes some effort, but not like real lifting.
Yes, that big empty space is where the 24-shaft loom used to be, and where the Jacq3G will go.

The 24-shaft loom is now in its new position:

In the picture, DH is standing inside the loom to make adjustments to the multitude of cables - cables for the computer, cables for the dobby unit, etc. One thing we did away with was the Ethernet cable. The computer is now (and the computer on the jacquard will be) wireless!
The Glimakra is now (temporarily) in the kitchenette:

In the next few days, I'll post sales ads for the Glimakra in various online locations. Details will be posted here as well.
P.S. Tim is still exhausted today, and is spending his time napping under the dining table. No more deer for him!
Tuesday, November 10, 2009
The Deerstalkers
Today, as DH and I moved looms around in the studio, we noticed a small group of deer on the hill behind the house - a buck and a couple of does.
Then we saw Tim (the larger, older, and more experienced hunter of our two cats) lurking on the hillside below the deer, not far from one of the does. Tim is the brown lump with ears in the lower right corner of the picture. (Click the image to see the full-sized version.)

The doe clearly knew he was there, but she was curious and began to approach him.

Tim stood his ground as she got closer, although he hunched down and his ears went back.

Then I realized that Gracie (the younger of the two cats, much less experienced hunter, and generally more cautious) had crept up the hill, watching this drama unfold. I wondered how close Tim would let the doe get before he acted, and wondered just what he'd decide to do.

At that point, several things happened simultaneously:
The camera batteries chirped and died.
The doe crossed the line of Tim's comfort zone.
Tim hissed at her and ran back down the hill, colliding with Gracie on the way.
The doe jumped backwards, and ran up the hill.
Gracie hissed, arched her back, raised the fur all along her spine, and fluffed her tail out, just as if it had been her adventure, not Tim's.
After all this excitement, the cats are both sleeping the sleep of the exhausted, overstimulated, and disappointed hunter. Maybe next time...
Getting Ready for the Jacq3G
More preparations underway. On the advice of Sheila O'Hara, who uses an AVL jacquard loom of the earlier generation, I've been making some loom files. They're not really terribly exciting visually, but should be useful now and then.

The first one consists of a white square, 960 pixels by 960 pixels, with a 1-pixel-wide line of black traveling diagonally from upper left to lower right. It's designed to lift one hook at a time, to make threading easier and more error-free. I'll probably only use this file once; after that, I'll tie on and pull through instead of rethreading, except in the unfortunate (if not tragic!) case that Alice Schlein recently experienced, in which a warp refused to cooperate and broke rather than allow itself to be pulled through the heddles.

And this one lifts 5 hooks at a time, from left to right, to make sleying the reed more error-free. No more crossed threads!!! I also made files that lift 2 hooks at a time, 3 at a time, and 4 at a time. Given the various reeds I've got (8, 10, 12, 15, 17, and 20 dents per inch), these files should cover all the possible thread densities I'll ever need.
What I don't know yet, having never physically threaded a jacquard, is whether it is easier to work from left to right, or from right to left. On the 24-shaft loom, I thread from right to left. The unthreaded heddles are all pushed off to the left side until I need them.
On the Jacq3G, you can't push unthreaded hooks aside. Each 120-hook module is set on the diagonal, with the right side closer to the weaver than the left. The slant is adjustable - that is how you change from one sett to another, by rotating the modules and thereby making the hooks closer together or farther apart. One can make the sett as wide as possible for ease of threading, then rotate the modules to the sett appropriate to the weaving.
These files are similar in concept to the files I create for threading the 24-shaft loom (described in detail here), in which the treadling is identical to the threading, and the tie-up lifts 1 shaft at a time, thereby telling me which shaft to pull the next heddle from. Before I began using the threading files, I used a lot more colorful language, turning the air blue around the loom as I discovered threading errors in the middle of a complicated threading. Usually these were only discovered when I got to the last heddle and had too few threads, or too many threads left over. The "treadle your threading" method has curbed the errors (and the bad language) dramatically.
Monday, November 09, 2009
Back from Santa Monica
Whew! It was a long weekend, very hard work. We drove to Santa Monica Thursday morning, set up the booth that afternoon, worked the show Friday, Saturday, and Sunday, tore down the booth after closing on Sunday, and drove home today (Monday).
But it was worth all the effort. I just finished running the numbers: sales were over 3 times more than at the same show last year. Part of that was booth location - last year we were in the very back of the hall, and fewer people found their way there; this year, we had asked for a location nearer the front of the hall. Ask and ye shall receive - we were given the a booth space right near the entrance. We got 'em both coming in and going out :)
Anyway, I feel much better about the state of the economy today.
Here are a couple of shots of the booth (we were outdoors, so we used a 10x10-foot popup canopy). First, the scarf side of the booth:

And then the wood side:

Sharing the space works out well, because the scarves and the wood have different display requirements - DH gets the tables, I get the walls.
This week, my main task is to finish the Pendleton selvedge rug so I can disassemble and sell the Glimakra, and make room for the Jacq3G. Even more to feel good about!
Monday, November 02, 2009
Another Note on Structure Diagrams
I just realized that the diagrams aren't an exact representation of the structures as they appear in the cloth, because of sett.
I sett the interleaved threadings very close - about 1/4 to 1/3 tighter than the normal twill sett for the yarn I'm using. In addition, I use a weft that is much finer than the warp (for example, 60/2 silk warp and 100/2 weft), and weave at fewer ppi than epi.
So the "pixels" represented by the intersection of a warp and a weft aren't actually square. Rather, the warp pixels should look wider and taller, and the weft pixels should be narrower and shorter, which is difficult to show in Photoshop.
On some pieces, depending on the relative value of the weft compared to the two warps, the weft almost disappears, and all you see is the warps.
Okay, back to work getting ready for the weekend show.
If you're in the greater Los Angeles area, and have free time over the weekend, please drop by. The Contemporary Craft Market is held at the Santa Monica Civic Auditorium, 1855 Main Street. Hours are 10 AM to 6 PM daily, November 6 through 8.
If you think you might attend, you can download a pass good for two free admissions from the Contemporary Craft Market website. Or send me an email (sandra at 3springshandworks dot com) and I'll mail you a postcard good for the same two free admissions.
Note Regarding Dual-Warp Structures
I really enjoyed the process of analyzing the various possible combinations of structures when using 4-end twill and 5-end satin in a dual-warp threading. Putting them down on paper is very satisfying (hey, it's the Virgo in me - I'm compelled to organize things).
For the 4-end twill combinations, I took a draft that I'd woven in the past, changed the warp colors to 2 shades of grey for clarity, and made screen captures of different areas of the draft. In that draft, there were examples of every possible combination. So long as the tie-up contains all three structures (1/3, 3/1, and 2/2) and the interleaved threading spans the entire range of available shafts, you'll see all 9 combinations at least once.
For the 5-end satins, I had to start from scratch, since I've never woven an interleaved threading in satin. But having just analyzed the 4-end twill combinations, it was easy to create the 5-end satin combinations from scratch in Photoshop.
Each family consists of "inclusive" structures, as defined in The Woven Pixel, so when used together there will be no floats longer than the normal floats for the structure (3 threads for 4-end twill, 4 threads for 5-end satin).
The closer I get to actually having a jacquard loom, the more I realize I need to know about structure in order to fully utilize the capability of the loom, and the more time I'm tempted to spend at the computer making Photoshop "pattern presets." But there are tasks waiting in the studio, a warp to get woven off before I sell the Glimakra, and a show in Santa Monica next weekend to get ready for. So for now, I have to restrain myself, and get back to work.
And yes, Alice, I do stop for meals, and mugs of tea, and a glass of wine in the evening :)
Sunday, November 01, 2009
More Dual-Warp Weave Structures
Okay, I couldn't help myself. I simply had to see what happens if the base structure is 5-end satin instead of 4-end twill. Sixteen possibilities here.

For this diagram, I made the dark warp blue and the light warp green. If you click on the diagram to display the full-size version, you'll see that as with the twill example in the last post, as you move from upper left to lower right, the interlacement moves from weft-faced to warp faced. As you move from lower left to upper right, the interlacement moves from more blue warp than green to more green warp than blue.
The differences between the 16 blocks are fairly subtle, so I don't think one would use all 16 in a single cloth. However, choosing for example the structures in the 4 corner blocks would give max contrast. All this with only 3 yarn colors.
Key to diagram:
1 dk 1 lt, 1 dk 2 lt, 1 dk 3 lt, 1 dk 4 lt
2 dk 1 lt, 2 dk 2 lt, 2 dk 3 lt, 2 dk 4 lt
3 dk 1 lt, 3 dk 2 lt, 3 dk 3 lt, 3 dk 4 lt
4 dk 1 lt, 4 dk 2 lt, 4 dk 3 lt, 4 dk 4 lt
Subscribe to:
Posts (Atom)