In a comment on yesterday's post, Tobie asked "Where do you get all those lovely woods and what do you mordant with?"
My husband is a woodturner, and he belongs to a large woodturner's club, many of whose members happily supply the leftovers from their turning projects, so I've got lots of sources for wood. After all, when you make a lathe-turned bowl or vessel, the entire inside of that volume ends up on the shop floor. Anything that's either a fruit wood (apple, cherry, etc.) or a tropical hardwood is practically guaranteed to give good color. In fact, every wood I've tried gave *some* color - just not always intense or attractive.
This post shows an experiment from last October.
What I use to mordant the yarn (or cloth) depends on the fiber content. Generally, I use Potassium Aluminum Sulfate on protein fibers such as silk and wool. This is the same stuff as the alum you use to make pickles crisp, but there are sources much cheaper than the grocery store. Any dye house (Dharma, ProChem, and many smaller companies) sells it.
For cellulose fibers (cotton, linen, tencel, rayon) I use Aluminum Acetate, which I learned about from Michele Wiplinger of Earthues. Many dye companies now carry it.
I have some mill cones of a 30/2 tencel/silk blend yarn, and for that type of blend, either mordant will do. Conventional alum is much cheaper than aluminum acetate, though, so the choice is easy :-)
Occasionally, I'll use an iron premordant or afterbath if I'm after a very dark color and I believe the dyestuff won't get there without a kick in the pants. Ditto for some of the other metal salts such as tin and copper - they can shift the color slightly. With careful handling, i.e., wear a mask when handling fine powder, wear gloves, and don't drink the stuff, none of these chemicals is especially harmful.
On my website, there's a link to a PDF of the procedure I use to extract color from wood - or in fact any woody material like madder or alkanet roots - feel free to download it and give it a try. My motto is "free stuff is good" and in this case, not only is it free dyestuff, it's a great way to recycle/reuse the chips that would otherwise just go straight to the green-waste facility.
If you've got a custom furniture or other woodworking company in your area, drop by and ask if they would be willing to donate a bag of wood chips - they usually have to pay to have it hauled away. A friend of mine asked the guy who made a custom front door for her for chips, and he gave her a bag nearly as big as she is. Unfortunately, it was a wood that only made a pale color so we used 99% of it for mulch instead of dye...
Wednesday, February 26, 2014
Tuesday, February 25, 2014
More Potpouri
Yesterday, I made good progress on the Aileen image - it's now completely woven and I need to decide what is next on the agenda. Here are two shots - one with me and Aileen, and the second with Aileen and my sister.


On the stove (though not being heated) are a couple of dyepots. Here's the silk tramm in a dyebath extracted from Brazilian Cherry (no relation to the true North American cherry tree, but apparently the lumber looks similar. The liquid has a strong orange/red tinge, but what's hitting the silk is a nice rich butterscotch.

This is silk crepe in a dyebath of alkanet root that I extracted in alcohol. Twice: this is the second extraction. What's odd is that the camera sees violet, which is what alkanet is supposed to give, but is very stingy about, while my eye sees a warm grey. It will be interesting to see what the cloth really looks like after it has soaked a few more days and then been gently washed and pressed.

On the stove (though not being heated) are a couple of dyepots. Here's the silk tramm in a dyebath extracted from Brazilian Cherry (no relation to the true North American cherry tree, but apparently the lumber looks similar. The liquid has a strong orange/red tinge, but what's hitting the silk is a nice rich butterscotch.
This is silk crepe in a dyebath of alkanet root that I extracted in alcohol. Twice: this is the second extraction. What's odd is that the camera sees violet, which is what alkanet is supposed to give, but is very stingy about, while my eye sees a warm grey. It will be interesting to see what the cloth really looks like after it has soaked a few more days and then been gently washed and pressed.
Monday, February 24, 2014
Potpourri
Several things are going on in the studio currently.
On the jacquard loom, I've started weaving another copy of the Aileen image. The original, woven on 960 hooks, went to my sister as a birthday gift; the next one, woven on 1,440 hooks, had too many lifting errors in it that I couldn't fix with needle and thread; so I need another to use as a booth sample Woven Portrait. (You can find a link to a PDF of the flyer for them here.)

In a pot in the studio mini-kitchen, there are a couple of lengths of silk chiffon soaking in the remains of the bloodwood dye that I used back in October; the pot has been sitting on the balcony waiting for me to use up the rest of the color left in it. I think I have some madder-dyed fleece in the stash that would be a close match, which I will felt onto the silk.

And in another pot is a skein of fine tramm silk soaking in a cold alum mordant bath. It'll be ready for a fresh wood-derived dyebath in 2 or 3 more days. Because tramm tangles if you look at it crosswise, and is one of the most difficult threads to wind from a skein onto cones, I try to keep agitation and movement to an absolute minimum. So a cold mordant soak of up to a week, then a room-temperature dyebath that doesn't need a lot of stirring is best.

Those are just some of the projects going on in the studio this week. In addition, DH and I are collaborating on an "interactive textile" intended to be entered into the ITAB 2014 exhibition, information about which is on this page. Until it's completed, and entered, I can't talk much more about it, except to say DH is having a lot of fun playing with some new toys - hardware and software for the Arduino platform - that will be incorporated into a jacquard weaving.
On the jacquard loom, I've started weaving another copy of the Aileen image. The original, woven on 960 hooks, went to my sister as a birthday gift; the next one, woven on 1,440 hooks, had too many lifting errors in it that I couldn't fix with needle and thread; so I need another to use as a booth sample Woven Portrait. (You can find a link to a PDF of the flyer for them here.)
In a pot in the studio mini-kitchen, there are a couple of lengths of silk chiffon soaking in the remains of the bloodwood dye that I used back in October; the pot has been sitting on the balcony waiting for me to use up the rest of the color left in it. I think I have some madder-dyed fleece in the stash that would be a close match, which I will felt onto the silk.
And in another pot is a skein of fine tramm silk soaking in a cold alum mordant bath. It'll be ready for a fresh wood-derived dyebath in 2 or 3 more days. Because tramm tangles if you look at it crosswise, and is one of the most difficult threads to wind from a skein onto cones, I try to keep agitation and movement to an absolute minimum. So a cold mordant soak of up to a week, then a room-temperature dyebath that doesn't need a lot of stirring is best.
Those are just some of the projects going on in the studio this week. In addition, DH and I are collaborating on an "interactive textile" intended to be entered into the ITAB 2014 exhibition, information about which is on this page. Until it's completed, and entered, I can't talk much more about it, except to say DH is having a lot of fun playing with some new toys - hardware and software for the Arduino platform - that will be incorporated into a jacquard weaving.
Sunday, February 23, 2014
Spring Is In The Air
I don't know how the daffodils have enough energy to send up blooms, since we've had only about 2 inches of rain in the last year compared to the usual 12 inches annually, but they're stubborn (or perhaps optimistic is a better word):

Even Gracie is enjoying being outdoors - and she's the original "don't wake me until May" girl.

Even Gracie is enjoying being outdoors - and she's the original "don't wake me until May" girl.
Friday, February 21, 2014
Workstation
This is my workstation for now:

DH built this fringing stand for me a few years back, using ordinary white PVC pipe for most of the structure, and black PVC pipe (which is a stronger compound) for the two pieces that form a clamp to hold the cloth securely.
I use a Conair hair twister to make the fringes. It duplicates exactly the motions I would use by hand, twisting two groups in the S direction and then plying them together in the Z direction:

The result is very even fringes, much more quickly and with less hand stress than I ever could if I used only my hands:

I haven't checked eBay lately for a backup twister - I probably should do that before they go out of production altogether. This one has held up remarkable well, considering that the gears inside are made of plastic, but a backup would be a good idea.
DH built this fringing stand for me a few years back, using ordinary white PVC pipe for most of the structure, and black PVC pipe (which is a stronger compound) for the two pieces that form a clamp to hold the cloth securely.
I use a Conair hair twister to make the fringes. It duplicates exactly the motions I would use by hand, twisting two groups in the S direction and then plying them together in the Z direction:
The result is very even fringes, much more quickly and with less hand stress than I ever could if I used only my hands:
I haven't checked eBay lately for a backup twister - I probably should do that before they go out of production altogether. This one has held up remarkable well, considering that the gears inside are made of plastic, but a backup would be a good idea.
Thursday, February 20, 2014
Olive Hyde Art Gallery
I've just gotten word that three of my jacquard pieces have been accepted in the 46th Annual Textile Exhibit at the Olive Hyde Gallery in Fremont, California. Exhibition dates: March 28 through April 26, 2014. Opening Reception, March 28 from 7:00 to 9:00 pm (I don't know yet if I'll be able to attend - must check the calendar before deciding).
The three pieces are the Cymbidium, Lilac, and Purple Rose weavings:


The three pieces are the Cymbidium, Lilac, and Purple Rose weavings:
Wednesday, February 19, 2014
The Cut-Off Point
This afternoon was cut-off time for the silk-pygora project:

Let the fringing begin!
In other news, I've (re)discovered kumihimo, and have decided that it is a better airplane project than knitting. At Convergence some years ago, I took my first kumihimo class with Giovanna Imperia, working with wire as she does for her spectacular jewelry. After the class, I did what we all do - I put away the bag containing my half-finished braids and foam kumihimo disks, and then somehow never picked them up again. At the February meeting of my local guild, the Central Coast Weavers, we had a hands-on program on kumihimo, and I reconnected with it in a very positive way. Fodder for future airplane trips! No implements with sharp points! No scissors! Won't the TSA be pleased.........
Tuesday, February 18, 2014
And Did I Mention the Knots?
In an earlier post, I said that the silk I'm using for warp is just *full* of slubs and knots. If I had paid full retail price for the yarn, I'd be really unhappy, but I didn't so I'm not complaining as loudly as I might.

This is what the back of the loom looks like, and I've only woven the first half of the third scarf, so there are bound to be more film canisters back there before I'm done.
The black thread is just a "leader," like a fishing line, which allows me to cut a replacement piece of silk that's just barely long enough - the black thread lets the canister hang down from the loom without wasting silk thread.
The first scarf had about 4 or 5 knots, the second scarf came in at 6. It would have been more, but I eliminated a lot of knots during the process of winding the warp, something I rarely take the time to do. Usually, it's faster to replace a knotted warp end in the middle of the weaving than try to correct it while winding onto the warping wheel with 4 threads at a time - too much risk of tangles and differences of tension.
Here's what scarf #3 looks like on the loom. Because the aspect ratio is not 1:1, the design is stretched in the warpwise direction, which I don't mind at all. I like the "fractured" effect!
Sunday, February 16, 2014
Scarf #3
I have finally decided on a draft for the third silk-pygora scarf. It's a (nearly) tromp-as-writ draft:

I should get started on it this afternoon.
I should get started on it this afternoon.
Saturday, February 15, 2014
Getting Ready for the Third Silk-Pygora Scarf
In fact, I am ready except for a draft I like! Still working on that part.
In the meantime, here's a better look at scarf #2 on its way onto the cloth beam at the back of the loom:

Just to give you an idea just how fuzzy this pygora yarn is, here's a closeup of a wound pirn. You can see a few dark guard hairs that the mill didn't quite manage to remove during the dehairing process, and the fluff sticking out on all sides of the pirn.

In the meantime, here's a better look at scarf #2 on its way onto the cloth beam at the back of the loom:
Just to give you an idea just how fuzzy this pygora yarn is, here's a closeup of a wound pirn. You can see a few dark guard hairs that the mill didn't quite manage to remove during the dehairing process, and the fluff sticking out on all sides of the pirn.
Thursday, February 13, 2014
Second Scarf
I had time to start scarf #2 yesterday evening:

Now I need to design a third treadling for this warp. I've tried a few (in software only)but haven't got anything I like yet.
Now I need to design a third treadling for this warp. I've tried a few (in software only)but haven't got anything I like yet.
Tuesday, February 11, 2014
Weaving Silk & Pygora
At 26 picks per inch, the weaving goes very quickly. I'm nearly done with the first scarf on the warp.

Unlike the draft, here the warp is lighter than the weft, so the cloth looks a little different from the draft. Not a problem.
The weft yarn is getting fuzzy just being wound onto a pirn, and more being sent through a shed, and more being beat lightly into place. I can't wait to see what the wet-finished cloth will be like!
Monday, February 10, 2014
Ready to Tie
The silk warp is ready to lash onto the cloth beam. I'll finish that by dinnertime, and do the initial tensioning, then let the warp settle overnight. I hope to begin the weaving tomorrow.

Saturday, February 08, 2014
On the Dobby Loom
I've been working on a draft for the silk warp/pygora weft project that has been beamed on the 24-shaft loom. I wanted a fairly simple draft, because the fibers should be the main attraction, not a complex design. Here's a partial view of what I've come up with: Warp stripes of two alternating widths, with an advancing twill running one direction in the wider stripes and another direction in the narrower stripes.

I've got enough warp for 3 scarves, so I need 2 more treadlings that will play nice with this treading. One possibility is this one:

Still another to go, although the threading is done - it just needs to be double-checked.
I've got enough warp for 3 scarves, so I need 2 more treadlings that will play nice with this treading. One possibility is this one:
Still another to go, although the threading is done - it just needs to be double-checked.
Friday, February 07, 2014
Chugging Along: Towel #2
After complaining about the difference in treadling effort with the original tie-up, I decided to bite the bullet and redo the tie-up. I arranged things so that the treadle tied to only 1 shaft is on the side toward the lamm hinge (the right side from the seated weaver's viewpoint), and the treadle tied to 3 shafts is on the far left; next to it are the treadles tied to 2 shafts each.
Of course, that meant re-memorizing the treadling block sequences, but there are only 2 blocks so that's no big deal.
I'm near the middle of towel #2 in this photo:

Of course, that meant re-memorizing the treadling block sequences, but there are only 2 blocks so that's no big deal.
I'm near the middle of towel #2 in this photo:
Thursday, February 06, 2014
And We're Off!
After so much tinkering with the loom to make it the width that I wanted, I'm relieved to find that it still knows how to weave:

The tiger maple Leclerc used back in the '70s certainly shows up well in this shot - those aren't lines of shadow on the far upright, just the grain of the wood.
It will take a little more tinkering to get the tie-up cords all the proper length; this loom has side-hinged lamms, so the length needs to be different for cords on treadle 1 compared to those on treadle 6. Also because of the side-hinged lamms, the treadling effort is more on treadles 5 and 6, and light on treadles 1 and 2. I suspect this may be why some loom makers (Gilmore, for example) went to lamms that stay parallel to the floor during treadling - that way, the force required is equal on all treadles.
The draft is Bronson Lace based on the design I posted here.
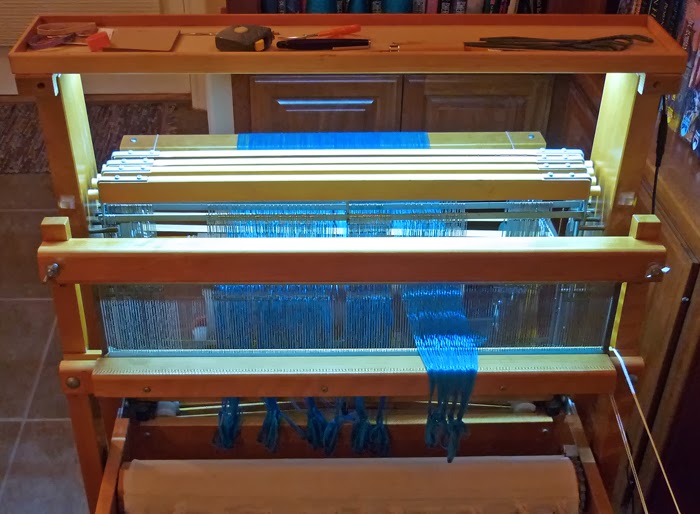
Still Getting Ready to Weave
A few miscellaneous shots of the progress to date. In the first photo, you can see the LED light strip attached to the underside of the castle tray.


Still to do: attach the tieup cords, and start weaving!
Still to do: attach the tieup cords, and start weaving!
Wednesday, February 05, 2014
Reincarnation
The wood parts trimmed from the Artisat loom are appearing in new forms. Morgaine Wilder of Carolina Homespun has asked DH to make some nostepinnes (Scandinavian tools for making center-pull yarn balls) for her upcoming season of weaving/spinning/needlework conferences. Every year about this time he gets an order from her.
A few of them, like this one, will be made from the beautiful fine-grained maple he got courtesy of Leclerc Looms:

And no, I did not weave the tablecloth under it. I spent so much time in the store examining the cloth to see how it was woven, I was ashamed not to buy it. There are areas of rib weave, basket weave, and warp/weft floats. This one is pure, unadulterated polyester; I think I'd use linen. I probably have some 40/2 in the stash that would make beautiful table runners in this design.
A few of them, like this one, will be made from the beautiful fine-grained maple he got courtesy of Leclerc Looms:
And no, I did not weave the tablecloth under it. I spent so much time in the store examining the cloth to see how it was woven, I was ashamed not to buy it. There are areas of rib weave, basket weave, and warp/weft floats. This one is pure, unadulterated polyester; I think I'd use linen. I probably have some 40/2 in the stash that would make beautiful table runners in this design.
Under Castle Light-Strip
In a comment on yesterday's post, a reader asked "Are your lights battery powered? I don't see a cord in the image."
If you click on the image to display the full-sized version, you can see a black cord hanging down from the right side of the castle tray. DH the electronics guru wired it up for me with a DC power adapter that plugs into an AC socket. Some light strips come already wired - just check the product description when buying.
If you click on the image to display the full-sized version, you can see a black cord hanging down from the right side of the castle tray. DH the electronics guru wired it up for me with a DC power adapter that plugs into an AC socket. Some light strips come already wired - just check the product description when buying.
Tuesday, February 04, 2014
Let the Sleying Begin!
Only a few inches done so far, but dinner called and I had to answer :-)
The under-castle lighting is working out really well. This photo was taken after dark, so there was no light coming in the window to the right of the loom, and only a little from hallway lighting. The bright light is all supplied by the LED light-strip on the underside of the castle tray that DH added to the loom.
There's been a lot of talk lately on WeaveTech about under-castle lighting. If you consider it, please don't buy from a specialist website such as some posters suggested - IMHO Amazon is much less expensive, and delivers very quickly (usually under 48 hours, even here in the boondocks).
Bright Idea!
In a comment on the last post, Stephanie S said "Perhaps attach the raddle to the shuttle race with ball bungees?" which got me thinking (an activity that always gets me in trouble but maybe not this time). I''ve decided to order a 4-dent reed the same size as a normal reed for this loom, but with an open top. That way, I can simply remove the beater top and the normal reed from the beater, slide the open-top reed into the beater, arrange the warp as I do using the AVL raddle, lower the the beater top slightly to hold the warp threads in place, and beam away. After all, the AVL raddle is 4 spaces per inch, and I'm accustomed to winding warps to fit into those parameters...
Thanks, Stephanie, for turning on the lights for me!
Thanks, Stephanie, for turning on the lights for me!
Monday, February 03, 2014
Warping Progress
From these 2 warp chains (posing with cones of yarn for weft):

..the next step was here:

This is what it looked like from the front, with the warp chains running through the AVL raddle (held in place with clamps borrowed from DH's workshop) then over and around the front beam, and back through the shafts where I could hold them while winding the warp beam.

DH made brackets that let me tie 2 lengths of cord to suspend the lease sticks behind the shafts.

Before I began threading, we moved the loom out of the dining room to its permanent home in an alcove in the upstairs hallway (aka the reading room), where I'm using the threading tracker function of iWeaveIt on my tablet to make threading easier than trying to read numbers from a sheet of paper:

Now I have a decision to make: which do I need more (or perhaps sooner), a raddle sized for this little loom,with a way to attach it more securely than clamps, or adapters to make the warp beam into a sectional beam? Hmmm. Difficult decision, neither option being at all out of DH's skill set...
..the next step was here:
This is what it looked like from the front, with the warp chains running through the AVL raddle (held in place with clamps borrowed from DH's workshop) then over and around the front beam, and back through the shafts where I could hold them while winding the warp beam.
DH made brackets that let me tie 2 lengths of cord to suspend the lease sticks behind the shafts.
Before I began threading, we moved the loom out of the dining room to its permanent home in an alcove in the upstairs hallway (aka the reading room), where I'm using the threading tracker function of iWeaveIt on my tablet to make threading easier than trying to read numbers from a sheet of paper:
Now I have a decision to make: which do I need more (or perhaps sooner), a raddle sized for this little loom,with a way to attach it more securely than clamps, or adapters to make the warp beam into a sectional beam? Hmmm. Difficult decision, neither option being at all out of DH's skill set...
Saturday, February 01, 2014
Ready to Warp!
After successfully registering for Complex Weavers Seminars, coming up in June, I am now ready to wind the warp for the 4-shaft loom. Should be easy-peasy, although I confess it has been a long time since I used the warping reel - the warping wheel has been my tool of choice for a long time, but the 4-shaft loom has a plain warp beam, not a sectional beam, so the reel it is.

(It's a huge relief to have been able to get the CW registration complete - 2 years ago I didn't register until a few days after registration opened, and I had to wait for somebody else to cancel before my name cleared the waitlist.)
(It's a huge relief to have been able to get the CW registration complete - 2 years ago I didn't register until a few days after registration opened, and I had to wait for somebody else to cancel before my name cleared the waitlist.)
Subscribe to:
Comments (Atom)